안녕하세요. 이번 포스팅에선 레이아웃파일(.xml)에서 텍스트 혹은 이미지에 프리뷰 용 샘플 데이터를 넣는 방법에 대해 알아보겠습니다.
사용목적
보통 리사이클러뷰나 리스트뷰 처럼 리스트 아이템에 해당하는 레이아웃을 따로 만들고 뷰에 적용하는 방식의 구성을 사용할 때, 실제 데이터가 정해지지 않은 상황에서 틀만 만들어야 하는 경우가 간혹 있죠. 그럴때 안드로이드에서 제공하는 샘플 데이터를 이용하여 데이터가 들어갔을 경우 어떤방식으로 뷰가 보여질지 확인할 수 있습니다.
사용방식
그냥 단순 텍스트나 이미지 단일 뷰에 적용 할 수도있지만 저는 사용성이 더 높은 리사이클러뷰의 아이템에 적용하였습니다.
먼저, 액티비티 레이아웃에 리사이클러뷰를 생성해줍니다.
<activity_main.xml>
<?xml version="1.0" encoding="utf-8"?>
<androidx.constraintlayout.widget.ConstraintLayout xmlns:android="http://schemas.android.com/apk/res/android"
    xmlns:app="http://schemas.android.com/apk/res-auto"
    xmlns:tools="http://schemas.android.com/tools"
    android:layout_width="match_parent"
    android:layout_height="match_parent"
    tools:context=".MainActivity">

    <androidx.recyclerview.widget.RecyclerView
        android:layout_width="match_parent"
        android:layout_height="match_parent"
        android:orientation="vertical"
        tools:listitem="@layout/list_item"
        app:layoutManager="androidx.recyclerview.widget.LinearLayoutManager"/>

</androidx.constraintlayout.widget.ConstraintLayout>
그 다음 리스트 아이템 레이아웃파일을 생성 한 후에 원하는 디자인으로 구현합니다. 저는 연락처 리스트 형식으로 프로필, 이름, 전화번호 총 3가지 아이템을 추가하였습니다.
<list_item.xml>
<?xml version="1.0" encoding="utf-8"?>
<androidx.constraintlayout.widget.ConstraintLayout xmlns:android="http://schemas.android.com/apk/res/android"
    android:layout_width="match_parent"
    android:layout_height="100dp"
    xmlns:app="http://schemas.android.com/apk/res-auto">

    <ImageView
        android:id="@+id/listProfileImage"
        android:layout_width="80dp"
        android:layout_margin="10dp"
        android:layout_height="match_parent"
        app:layout_constraintTop_toTopOf="parent"
        app:layout_constraintBottom_toBottomOf="parent"
        app:layout_constraintStart_toStartOf="parent" />

    <TextView
        android:id="@+id/listNameText"
        android:layout_width="wrap_content"
        android:layout_height="wrap_content"
        app:layout_constraintTop_toTopOf="parent"
        app:layout_constraintBottom_toBottomOf="parent"
        app:layout_constraintStart_toEndOf="@+id/listProfileImage"
        android:layout_marginStart="30dp"
        android:textColor="@color/black"
        android:textSize="17sp"/>

    <TextView
        android:id="@+id/listPhoneText"
        android:layout_width="wrap_content"
        android:layout_height="wrap_content"
        app:layout_constraintEnd_toEndOf="parent"
        app:layout_constraintTop_toTopOf="@+id/listNameText"
        app:layout_constraintBottom_toBottomOf="@+id/listNameText"
        android:layout_marginEnd="15dp"
        android:textSize="13sp"/>

</androidx.constraintlayout.widget.ConstraintLayout>
이렇게 적으면 실제 데이터가 들어가 있지 않기때문에 프리뷰엔 뷰의 위치만 잡혀있습니다.

이제 샘플데이터를 넣어서 확인해보겠습니다.
프로필 이미지뷰엔 avatars를,
tools:src="@tools:sample/avatars"
이름 텍스트뷰엔 full_names를,
tools:text="@tools:sample/full_names"
전화번호 텍스트뷰엔 us_phones를 넣었습니다.
tools:text="@tools:sample/us_phones"
리스트아이템 레이아웃에 랜덤한 이름과 사진, 전화번호가 적용되었습니다.

그럼 이제 액티비티 레이아웃도 확인해볼까요?
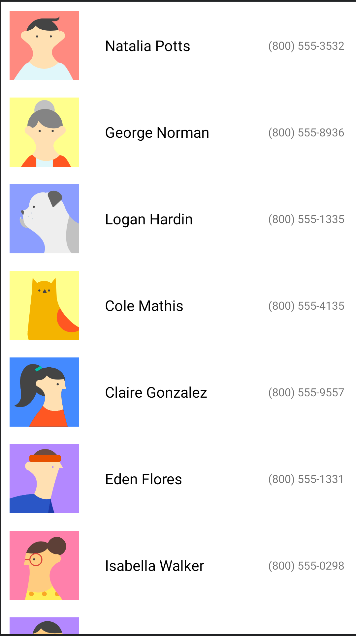
각각의 아이템마다 랜덤한 샘플데이터들이 들어갔습니다.
사용후기
물론 디버깅을 했을때 실제 뷰에 반영되는 데이터는 아니지만, 이미지의 컬러나 텍스트의 길이가 조금씩 달라서 뷰의 옵션을 유기적으로 조정하기 수월해 지는 것 같습니다. 감사합니다.

전체 소스
https://github.com/tekken5953/SampleDataExam
GitHub - tekken5953/SampleDataExam
Contribute to tekken5953/SampleDataExam development by creating an account on GitHub.
github.com
'Android' 카테고리의 다른 글
| [안드로이드] GPS 위치 정보 접근 권한 확인하기! (0) | 2023.05.31 |
|---|---|
| [안드로이드] Toast 메시지 누를때마다 갱신시키기 (0) | 2023.04.28 |
| [안드로이드] 배터리 잔량 + 충전상태 불러오기 - BatteryManager (0) | 2023.04.13 |
| [안드로이드] 텍스트 폰트 적용하기(Kotlin,Java,XML) (0) | 2023.04.07 |
| [안드로이드] 내 GPS 위치정보 + 상세주소 불러오기 - Google's Location Service (0) | 2023.03.31 |