안녕하세요. 이번 포스팅에서는 같은 디자인 및 속성을 공유하는 커스텀 뷰를 생성하고 적용하는 방법에 대해 알아보겠습니다.
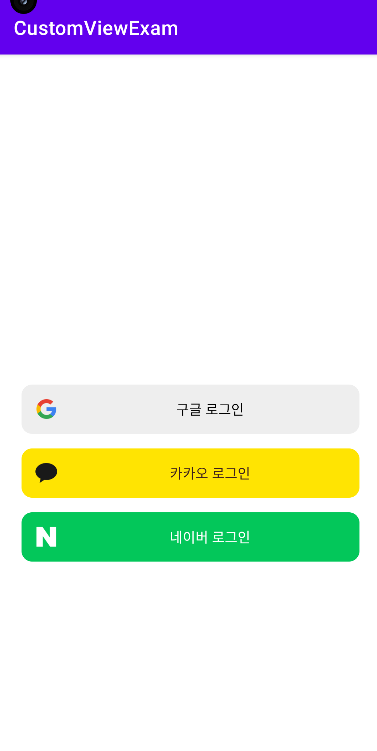
아래 사진은 버튼 3개에 커스텀 뷰를 적용한 화면입니다.
개요
프로젝트를 진행하면서 비슷한 기능에 비슷한 디자인의 뷰를 여러개 생성해야 하는 경우가 흔하게 발생합니다.
만약 뷰의 개수가 적다면 다행이지만 공통된 여러개의 뷰가 하나의 레이아웃을 이루고 있다면 골칫거리가 아닐 수 없죠.
그때 우리는 커스텀 뷰로 하나의 뷰 처럼 만들 수 있습니다.
아래 방식에 따라 예제를 진행하고 결과를 확인해 보겠습니다.
1. 커스텀 속성 파일 생성 및 정의
2. 커스텀 뷰 레이아웃 파일 생성
3. 커스텀 뷰 클래스 파일 생성
4. 메인 레이아웃 파일에 커스텀 뷰로 공통된 뷰 생성
본문
커스텀 속성 파일 생성 및 정의
attrs.xml value 파일 생성
values > New > Values Resource File > File Name : attrs
<attrs.xml>
<?xml version="1.0" encoding="utf-8"?>
<resources>
    <declare-styleable name="CustomLoginView">
        <attr name="loginTitle" format="string"/>
        <attr name="loginBgColor" format="color"/>
        <attr name="loginTextColor" format="color"/>
    </declare-styleable>
</resources>
커스텀 뷰의 속성을 정의 할 파일입니다. 로그인 타이틀과 백그라운드 컬러, 텍스트 컬러를 생성하였습니다.
※ 여기서 declar-styleable의 name은 생성할 CustomView의 클래스파일명과 동일하게 해주셔야합니다!
커스텀 뷰 레이아웃 파일 생성
버튼에 들어갈 이미지 1개와 텍스트 1개를 생성하였습니다. 아래는 레이아웃의 background drawable 파일입니다.
<custom_veiw_login_button.xml>
<?xml version="1.0" encoding="utf-8"?>
<RelativeLayout
    xmlns:android="http://schemas.android.com/apk/res/android"
    android:layout_width="match_parent"
    android:layout_height="50dp"
    android:layout_marginStart="24dp"
    android:layout_marginEnd="24dp"
    android:id="@+id/customLoginLayout"
    android:background="@drawable/custom_view_background">

    <ImageView
        android:id="@+id/customLoginImage"
        android:layout_width="30dp"
        android:layout_height="30dp"
        android:layout_centerVertical="true"
        android:layout_marginStart="10dp"/>

    <TextView
        android:id="@+id/customLoginTitle"
        android:layout_width="match_parent"
        android:layout_height="match_parent"
        android:layout_toEndOf="@+id/customLoginImage"
        android:gravity="center"/>

</RelativeLayout>
<custom_view_background.xml>
<?xml version="1.0" encoding="utf-8"?>
<ripple xmlns:android="http://schemas.android.com/apk/res/android"
    android:color="#B4cccccc">
    <item android:id="@android:id/background">
        <shape>
            <stroke android:color="#cccccc" android:width="1dp"/>
            <corners android:radius="10dp"/>
        </shape>
    </item>
</ripple>
커스텀 뷰 클래스 파일 생성
<CustomLoginView.kt>
import android.content.Context
import android.content.res.ColorStateList
import android.graphics.Color
import android.util.AttributeSet
import android.view.LayoutInflater
import android.widget.ImageView
import android.widget.RelativeLayout
import android.widget.TextView
import androidx.core.content.res.ResourcesCompat

class CustomLoginView(context: Context, attrs: AttributeSet?) : RelativeLayout(context, attrs) {

    init {
        val view =
            LayoutInflater.from(context).inflate(R.layout.custom_view_login_button, this, true)

        attrs?.let {
            val typedArray = context.obtainStyledAttributes(it, R.styleable.CustomLoginView)
            val customTitle = typedArray.getString(R.styleable.CustomLoginView_loginTitle)
            val customBgColor = typedArray.getColor(R.styleable.CustomLoginView_loginBgColor, Color.WHITE)
            val customTextColor = typedArray.getColor(R.styleable.CustomLoginView_loginTextColor, Color.BLACK)
            typedArray.recycle()

            val imageView = view.findViewById<ImageView>(R.id.customLoginImage)
            val textView = view.findViewById<TextView>(R.id.customLoginTitle)
            val layout = view.findViewById<RelativeLayout>(R.id.customLoginLayout)

            textView.apply {
                text = customTitle
                setTextColor(customTextColor)
            }

            layout.backgroundTintList = ColorStateList.valueOf(customBgColor)

            imageView.setImageDrawable(
                ResourcesCompat.getDrawable(
                    resources,
                    when (customTitle) {
                        "구글 로그인" -> {
                            R.drawable.login_google
                        }
                        "카카오 로그인" -> {
                            R.drawable.login_kakao
                        }
                        "네이버 로그인" -> {
                            R.drawable.login_naver
                        }
                        else -> {
                            R.mipmap.ic_launcher_round
                        }
                    },
                    null
                )
            )
        }
    }
}
※ TypedArray는 XML 리소스에서 속성 값을 읽어오기 위해 사용하는데, 효율적인 리소스 관리와 메모리 누수 방지를 위해 반드시 사용 후엔 recycle을 해주어야합니다!
obtainStyledAttributes 속성으로 1번에서 생성한 attrs의 attribute를 연결시켜줍니다.
연결한 View 타입의 get 메서드로 각각의 선언한 옵션값을 뷰에 적용시켜 주는 코드입니다.
이미지에 들어갈 값은 타이틀 이름에 따라 분기하여 적용시켜주었습니다.
메인 레이아웃 파일에 커스텀 뷰로 공통된 뷰 생성
loginTitle, loginBgColor, loginTextColor를 선언해주면 클래스 파일에서 해당 값을 사용합니다.
<activity_main.xml>
<?xml version="1.0" encoding="utf-8"?>
<androidx.constraintlayout.widget.ConstraintLayout
    xmlns:android="http://schemas.android.com/apk/res/android"
    xmlns:app="http://schemas.android.com/apk/res-auto"
    xmlns:tools="http://schemas.android.com/tools"
    android:layout_width="match_parent"
    android:layout_height="match_parent"
    tools:context=".MainActivity">

    <com.example.customviewexam.CustomLoginView
        android:id="@+id/loginGoogle"
        android:layout_width="wrap_content"
        android:layout_height="wrap_content"
        app:loginTitle="구글 로그인"
        app:loginBgColor="#eeeeee"
        app:loginTextColor="@color/black"
        app:layout_constraintTop_toTopOf="parent"
        app:layout_constraintBottom_toBottomOf="parent"
        app:layout_constraintStart_toStartOf="parent"
        app:layout_constraintEnd_toEndOf="parent"/>

    <com.example.customviewexam.CustomLoginView
        android:id="@+id/loginKakao"
        android:layout_width="wrap_content"
        android:layout_height="wrap_content"
        app:loginTitle="카카오 로그인"
        app:loginBgColor="#FFE402"
        app:loginTextColor="#3B1E1E"
        android:layout_marginTop="15dp"
        app:layout_constraintTop_toBottomOf="@+id/loginGoogle"
        app:layout_constraintStart_toStartOf="parent"
        app:layout_constraintEnd_toEndOf="parent"/>

    <com.example.customviewexam.CustomLoginView
        android:id="@+id/loginNaver"
        android:layout_width="wrap_content"
        android:layout_height="wrap_content"
        app:loginTitle="네이버 로그인"
        app:loginBgColor="#03C75A"
        app:loginTextColor="@color/white"
        android:layout_marginTop="15dp"
        app:layout_constraintTop_toBottomOf="@+id/loginKakao"
        app:layout_constraintStart_toStartOf="parent"
        app:layout_constraintEnd_toEndOf="parent"/>

</androidx.constraintlayout.widget.ConstraintLayout>
결론
위의 과정을 거치면 커스텀뷰 클래스 이름으로 버튼을 생성 할 수 있습니다.
예제는 2개의 뷰만 포함한 커스텀 뷰이지만 더 많은 뷰를 포함해야 할 수록 코드 라인도 줄고 성능도 향상됩니다.
추가적으로 버튼에 기능을 집어넣진 않았지만 커스텀 뷰로 뷰를 생성하면 기능을 정의할 때에도 액티비티 파일의 코드가 스크롤 지옥에서 벗어나서 좋은 것 같습니다.
감사합니다.

소스 코드
https://github.com/tekken5953/CustomViewExam
GitHub - tekken5953/CustomViewExam
Contribute to tekken5953/CustomViewExam development by creating an account on GitHub.
github.com
'Android' 카테고리의 다른 글
| [안드로이드] 단축키를 커스텀하여 개발속도 향상시키기⌨ (0) | 2023.09.01 |
|---|---|
| [안드로이드] 눌러서 공유하기 구현🔗 (0) | 2023.08.24 |
| [안드로이드] 앱 테마 모드 변경하기 (0) | 2023.08.22 |
| [안드로이드] 로그 색상과 길이 변경으로 가시성 올리기 (0) | 2023.08.18 |
| [안드로이드] Logger - 간단하고 예쁜 로그 출력 (0) | 2023.08.16 |